
Stand Out Evolution: Opal Roka, SPTW and TWAU
Start with Star Platinum for SPTW or The World for TWAU, then use an Opal Roka. Obtaining a mutation and successfully changing a Stand are separate random outcomes.
The two documented transformation pairs
| Equipped Stand | Opal Roka counterpart |
|---|---|
| Star Platinum | Star Platinum: The World (SPTW) |
| The World | The World: Alternative Universe (TWAU) |
Get the base Stand first
The Part 3 arrow card lists Star Platinum and The World at 5% each. The boss cards also list their Stand Chips: Jotaro can drop Star Platinum’s chip during the day, while DIO can drop The World’s at night. Neither boss card provides a percentage for that chip.
The chip route still involves replacement. Read the equipped Stand and the chip confirmation carefully before using it, particularly if you already own a form you wanted to preserve.
Grow Rokaka and look for the correct mutation
Grow a Rokaka seed and inspect the harvested item. The official mutation overview states a 3% chance for a mutation when the crop has grown. It does not state that every mutation is Opal, so 3% must not be advertised as a confirmed Opal-specific harvest probability.
The growing-room card says Rokakakas grow three times faster in a gang base’s Rokakaka Growing Room, specifically in public servers. Faster growth improves the number of harvests you can attempt; it does not establish a higher mutation probability.
Read the Opal effect before consuming it
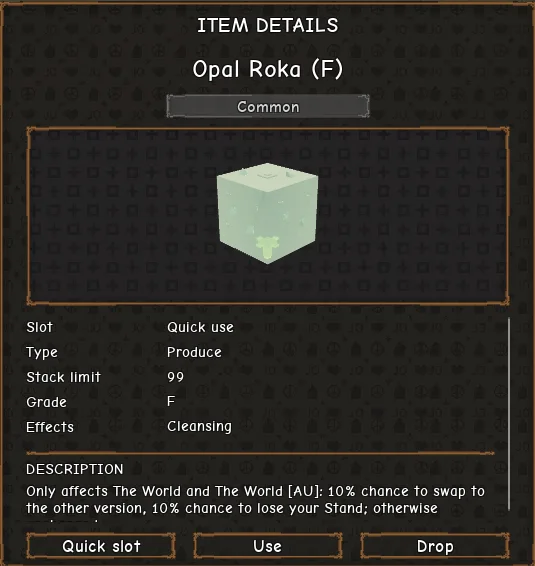
The current Opal card describes a 10% chance to swap between the paired versions and says higher product grades increase that chance. It does not provide a complete probability table for each grade. Ten uses therefore do not guarantee a successful swap.
This is described as a swap involving all four forms, not a one-way upgrade. If you already have SPTW or TWAU, do not consume another Opal merely because it is an evolution item.
Do not confuse the Roka types
| Type | Documented purpose |
|---|---|
| Opal | Changes between the two Stand pairs when successful. |
| Emerald | Removes a Stand, with chance affected by grade. |
| Sapphire | Can remove a sub-ability; its card lists a 50% chance and EXP even on failure. |
A sensible stopping rule
Our recommendation is to secure the base Stand, then save a small batch of the correct fruit and decide how many attempts you can afford. A failed swap is not evidence that you should spend every remaining arrow. Keep farming and evolution budgets separate.
The reference wiki groups the evolved forms outside the arrow table. Chasing Bizarre Arrows is therefore a base-Stand strategy, not a direct SPTW or TWAU recipe.
Sources and review date
Reviewed November 22, 2026 against the public Stand Out Trello and the linked Stand Out Wiki reference. This is a launch-era documentation review, not in-game testing; no numbered live build was verified. The 3% figure describes mutations generally; no Opal-only rate or per-grade swap table was verified.
- Official Trello: Opal Roka
- Official Trello: Mysterious Arrow [Part 3]
- Official Trello: Jotaro
- Official Trello: DIO
- Official Trello: All Rokakakas grow 3x faster inside of the Rokakaka Growing Room (Gang Base) (ONLY IN PUBLICS!!!)
- Official Trello: Sapphire Roka
- Stand Out Wiki: reference guide
- Play Stand Out by Studio Umbra: Europa